| 일 | 월 | 화 | 수 | 목 | 금 | 토 |
|---|---|---|---|---|---|---|
| 1 | ||||||
| 2 | 3 | 4 | 5 | 6 | 7 | 8 |
| 9 | 10 | 11 | 12 | 13 | 14 | 15 |
| 16 | 17 | 18 | 19 | 20 | 21 | 22 |
| 23 | 24 | 25 | 26 | 27 | 28 | 29 |
| 30 |
- Dialog
- 공유 기능
- 플레이 콘솔 프로덕션
- 안드로이드 api
- Callback
- android studio
- 레트로핏
- 안드로이드스튜디오
- Kotlin
- 비동기
- urlconnection
- 달력 만들기
- Bottom sheet
- 앱 출시
- 앱개발
- Exposed Drop-Down Menu
- 플레이스토어 앱 게시 문제
- android api
- 안드로이드 http
- 안드로이드 스튜디오
- Retrofit
- Today
- Total
Strong 감자의 공부
하단 Dialog( Bottomsheet) 만들기 -Kotlin 본문
사용 계기 : 선택지가 많다면 Dropdown보다는 Dialog가 보기 좋은것 같다.
하단 사진의 feeling은 노래에 맞춰 기분을 선택하는 버튼이다. 기분에는 기쁨 슬픔 공허함 등 여러가지가 있는데 이를 원래는 드랍다운으로 표시할려 했다. 하다보니 드랍다운으로 하면 지저분해보일것 같아 Dialog로 변경했다. (기능만 구현하여 디자인이 아직 구립니당 양해 부탁드려요+커스텀 토스트 코드는 이 글에 포함되어 있지 않습니다.)

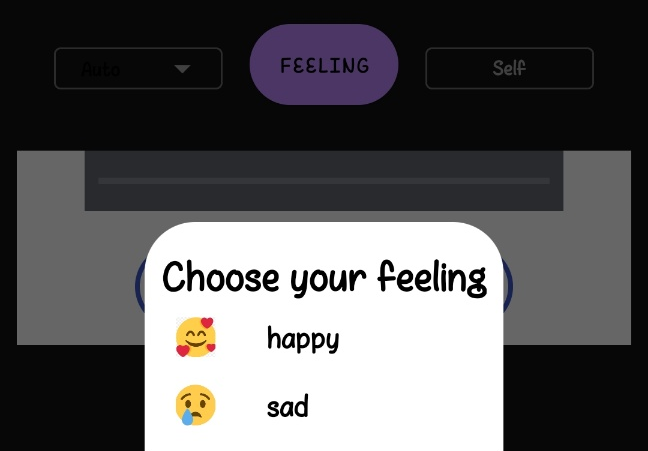

스타또~
▪️ 수정한 파일명과 설명
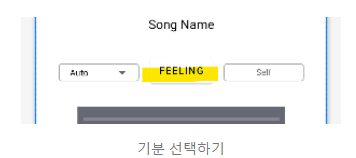
- activity_play_music.xml : Dialog가 띄어지는 xml
- PlayMusicActivity : Dialog가 띄어지는 xml의 kotlin파일
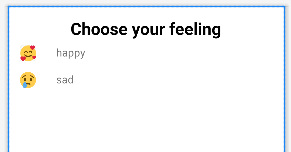
- bottomsheetlayout.xml : Dialog xml
- @drawable/round_btn.xml : activity_play_music.xml 의 버튼 둥글게 커스텀한 xml
- slide_in_bottom.xml ,slide_out_bottom.xml : Dialog 애니메이션 주기
- themes.xml : 애니메이션 테마 설정
▪️ activity_play_music.xml
<?xml version="1.0" encoding="utf-8"?>
<LinearLayout xmlns:android="http://schemas.android.com/apk/res/android"
    xmlns:tools="http://schemas.android.com/tools"
    android:layout_width="match_parent"
    android:layout_height="match_parent"
    xmlns:app="http://schemas.android.com/apk/res-auto"
    android:orientation="vertical"
    android:gravity="center"
    tools:context=".PlayMusicActivity">

	<Button
            android:layout_width="wrap_content"
            android:layout_height="wrap_content"
            android:id="@+id/selectTag"
            android:text="feeling"
            android:padding="3dp"
            android:textColor="@color/black"
            android:singleLine="true"
            android:background="@drawable/round_btn"/>
 </LinearLayout>
▪️ bottomsheetlayout.xml
?xml version="1.0" encoding="utf-8"?>
<LinearLayout xmlns:android="http://schemas.android.com/apk/res/android"
    android:layout_width="match_parent"
    android:layout_height="match_parent"
    android:orientation="vertical"
    android:background="@drawable/feelings_bg">
    <TextView
        android:id="@+id/choosetxt"
        android:layout_width="match_parent"
        android:layout_height="wrap_content"
        android:textAlignment="center"
        android:textColor="@color/black"
        android:text="Choose your feeling"
        android:layout_marginTop="5dp"
        android:textSize="25dp"
        android:textStyle="bold"/>
    <LinearLayout
        android:id="@+id/layouthappy"
        android:orientation="horizontal"
        android:layout_width="match_parent"
        android:layout_height="wrap_content"
        android:padding="8dp">

        <ImageView
            android:layout_width="24dp"
            android:layout_height="24dp"
            android:src="@drawable/happy"/>
        <TextView
            android:layout_width="wrap_content"
            android:layout_height="wrap_content"
            android:text="happy"
            android:layout_marginLeft="30dp"
            android:textSize="16sp"
            android:textColor="@color/black"/>
    </LinearLayout>

    <LinearLayout
        android:id="@+id/layoutsad"
        android:orientation="horizontal"
        android:layout_width="match_parent"
        android:layout_height="wrap_content"
        android:padding="8dp">

        <ImageView
            android:layout_width="24dp"
            android:layout_height="24dp"
            android:src="@drawable/sad"
           />
        <TextView
            android:layout_width="wrap_content"
            android:layout_height="wrap_content"
            android:text="sad"
            android:layout_marginLeft="30dp"
            android:textSize="16sp"
            android:textColor="@color/black"/>
    </LinearLayout>
</LinearLayout>
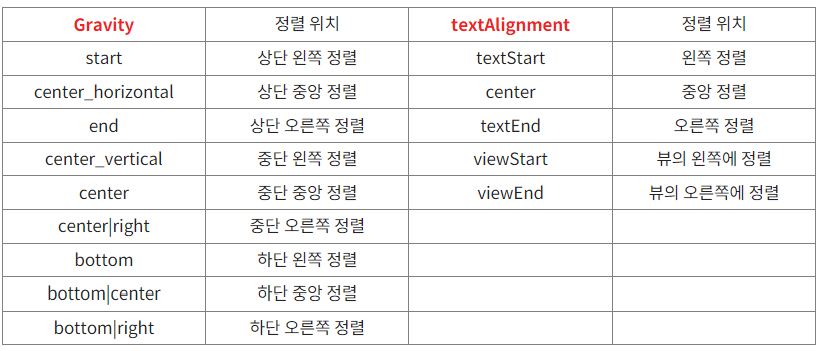
리니어 레이아웃 단위로 만듦 -> 리니어 레이아웃 단위로 클릭 가능
- 텍스트 뷰 글자자체 정렬
android:textAlignment="center"
▪️ PlayMusicActicity.kt
class PlayMusicActivity : AppCompatActivity() {

    private lateinit var binding:ActivityPlayMusicBinding


    override fun onCreate(savedInstanceState: Bundle?) {
        super.onCreate(savedInstanceState)
        binding = ActivityPlayMusicBinding.inflate(layoutInflater)
        setContentView(binding.root)

	// 버튼이 눌리면 Dialog를 띄움
        binding.selectTag.setOnClickListener{
            showDialog()
        }
 	}
// Dialog를 띄우는 함수
 private fun showDialog()
 	{
 	 val dialog = Dialog(this@PlayMusicActivity)
        dialog.requestWindowFeature(
            Window.FEATURE_NO_TITLE
        )
        dialog.setContentView(R.layout.bottomsheetlayout)
        dialog.window!!.attributes.windowAnimations=R.style.DialoAnimation // 애니메이션 지정
        dialog.window!!.setBackgroundDrawable(ColorDrawable(Color.TRANSPARENT)) // 배경색을 투명하게 하기
        var happylayout: LinearLayout =dialog.findViewById(R.id.layouthappy)
        var sadlayout: LinearLayout =dialog.findViewById(R.id.layoutsad)

        dialog.window!!.setGravity(Gravity.BOTTOM)

        happylayout.setOnClickListener{
            binding.selectTag.text="happy"
            Toast.makeText(this, "happy", Toast.LENGTH_SHORT).show()
        }
        sadlayout.setOnClickListener{
            binding.selectTag.text="sad"
            Toast.makeText(this, "sad", Toast.LENGTH_SHORT).show()
        }
        dialog.show()
        // Dialog 크기 변경(첨부 사진과 다르게 Dialog 가로 MATCH_PARENT됨)
        dialog.window?.setLayout(ViewGroup.LayoutParams.MATCH_PARENT,ViewGroup.LayoutParams.WRAP_CONTENT)
    }
}
▪️ Dialog 애니메이션 주기
1. slide_in_bottom.xml
<?xml version="1.0" encoding="utf-8"?>
<set xmlns:android="http://schemas.android.com/apk/res/android">
    <translate
        android:duration="@android:integer/config_mediumAnimTime"
        android:fromYDelta="100%p"
        android:toYDelta="0"
        />
</set>
2. slide_out_bottom.xml
<?xml version="1.0" encoding="utf-8"?>
<set xmlns:android="http://schemas.android.com/apk/res/android">
    <translate
        android:duration="@android:integer/config_mediumAnimTime"
        android:fromYDelta="0"
        android:toYDelta="100%p"
        />
</set>
fromXDelta : 시작 X축 값 (0 = 처음 자리)
toXDelta : 끝 X축 값 (100% = 오른쪽으로 100만큼 이동)
fromYDelta : 시작 Y축 값 (0 = 처음 자리)
toYDelta : 끝 Y축 값 (200% = 아래쪽으로 200만큼 이동) -출처) https://jhshjs.tistory.com/45
3. themes.xml 에 하단 코드 추가
<style name="DialoAnimation">
    <item name="android:windowEnterAnimation">@anim/slide_in_bottom</item>
    <item name="android:windowExitAnimation">@anim/slide_out_bottom</item>
</style>
4. 버튼 둥글게 커스텀 참고 : https://3001ssw.tistory.com/189
애니메이션 참고 : https://jhshjs.tistory.com/45
전체 코드 참고 영상 +2
'앱개발 > 졸업작품 with Kotlin' 카테고리의 다른 글
| RecyclerView01 -Kotlin (1) | 2023.03.31 |
|---|---|
| Volley이용해 JSON 날씨 받아오기 -Kotlin (3) | 2023.03.27 |
| 텍스트 외부공유 기능 -Kotlin (1) | 2023.03.25 |
| Exposed Drop-Down Menu 만들기 - Kotlin (1) | 2023.03.17 |
